We are lucky enough to be able to share another great guest post. We love how Jenny from Jennysis Crafts describes herself as a 'craftaholic'! She definitely puts that to good use with this tutorial on how to make a card box!
Hi crafty people! I’m Jenny and just love to craft, I make all sorts and run a range of workshops so I can share my passion. I started blogging free tutorials and ideas recently at
Jennysis Crafts and I want to encourage everyone to craft, no matter their experience. I run all sorts of workshops and teach all abilities and really wanted to offer these tutorials for anyone to reference. I stock all the materials I use in my shop so if you particularly like the papers or tools I use then you can buy them all in one place. Well enough about me, let’s get on with the crafting!
This adorable little box contains 5 beautiful 3x3” gift cards. Looks complicated?? It is, what I call, my ‘Easy Peasy Box’! Many moons ago I learnt how to make this wonderful box at a craft show, I have used it so much and has been something I have taught several times in my crafty workshops.
What I needed to create my card box :
- Seven 6x6” papers, I used the gorgeous ‘Love Letters’ from first edition.
- A5 sheet of white card (paper will work just as well)
- Five 3x3” card blanks with envelopes
- A variety of flower punches
- Double sided tape and foam pads
Ruler (which has inches and cm)
- Scoring tool.
- Scissors
Step 1:
Firstly take two of your pieces of 6x6” paper. I chose double sided pieces as you will end up seeing both sides. Choose which piece is going to be the top of your box. I chose a stripy one. The first thing we are going to do is put it to one side for a sec and take the piece you are going to have as the bottom. Measure and cut (or use a guillotine) a 2mm strip off the right edge and the top edge only.
Step 2:
Now measure 1.1/4 inches in from each corner and joining each mark together score 4 lines and fold.
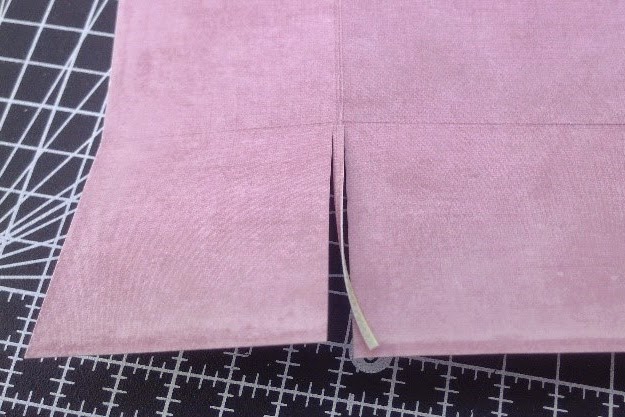
Step 3:
You will notice you have created 4 corner squares, we are now going to cut along one of the edges. Here a good tip is to carefully cut either side of the fold as this will help later on.
Step 4:
Repeat this with the other 4 corners. Remember you never cut both edges of a corner square!
You can see I have done opposite corners, This will help later on as well. Now repeat steps 2-4 on the other piece of paper you chose to be your box lid (do not trim the edges like you did to the first sheet or your box won’t close)
Step 5:
On the paper that is going to be a lid I cut two semi-circle holes down the two opposite edges, this will help open the box later on. You don’t have to do this stage if you don’t wish to.
Step 6:
Turn both of your paper over so the side you wish to see is facing you. You now need to attach tape to the 8 corner squares and then fold each in to create your box and lid.
Step 7:
Get creative! Let’s decorate your box! I was a bit boring and made the top look like my cards but I am sure you could be far more crafty!
Now that’s the box done and those creative juices warmed up so why not tackle the cards! I used the remaining 5 sheets of paper and cut five 2.5x2.5” squares in each one and then using my punches cut out lots of flowers. I also cut some white card into 2x2” to layer on top. I made all my cards using the same method but alternating the colours.
Now all that is left is to give them to someone lovely, write you gift cards to friends or keep them in a stash of lovely things you have made!
I hope you have enjoyed making your card box.
If you aren’t sure you wish to buy all the supplies then why not buy the kit, The flowers are all precut for you and you will only get the materials you actually need. If you are feeling more adventurous or wish to make many, then why not pop by my shop and browse my papers or click on the Card box link in the tutorials and it will give you a shopping list of all the items I used. For more tutorials, materials, gifts and kits pop over to
Jennysis Crafts
.............
Thanks Jenny for sharing such a fab tutorial, we can't wait to give it a try. We reckon these would make lovely gift sets and you could colour co-ordinate to your hearts content!


I feel giddy at the thought of making some of these, thanks for sharing such a wonderful tutorial! Will definitely be checking out Jenny's site.
ReplyDeleteWe love them too! Jenny has done a fantastic job :) x
DeleteWhat a super little gift idea and a great tutorial. X
ReplyDeleteWe totally agree Suze! x
Deletegreat guest blog x
ReplyDeletefab tutorial, simple and straightforward and easy to follow
thank you x
We're chuffed that Jenny shared such a great tutorial with us :) x
DeleteWhat a lovely clear tutorial, and they would make a lovely gift too.
ReplyDeleteThey would be a lovely gift to receive x
DeleteSuper cute and versatile too. I did a similar thing at Christmas with old cards, to make mini gift boxes, I've never tried then a bit bigger. Great clear instructions too.
ReplyDeleteWhat a great idea to use old Xmas cards! I'll try and remember that for this year! x
DeleteWhat a great tutorial can not wait to make one
ReplyDeleteLet us know how you get on Chris! x
DeleteThese would make lovely gift boxes too, great tutorial! x
ReplyDeleteWould be really versatile as a gift box too, as you could make them different sizes/colour etc! x
Deletelovely project and thanks for sharing the instructions
ReplyDeleteThanks Trace x
Delete